
How to Build a LEGO City – Part 1
October 31, 2017
Vote for the LEGO Ideas Project “History of Magic Museum”
November 2, 2017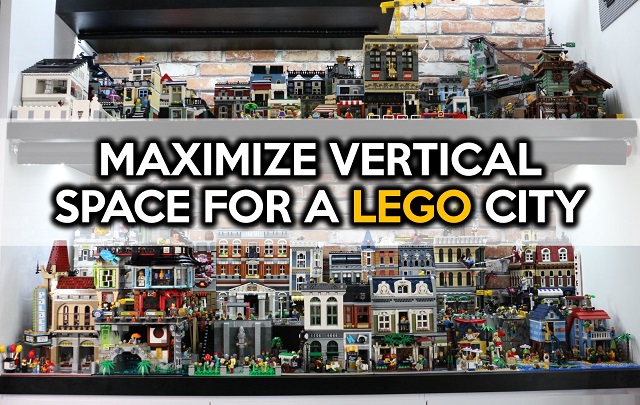
If you are building a brick city but have space limitations, you can always maximize the vertical space for a LEGO city. You can use the space under and above tables to create additional displays and expand your city.
Even if you currently do not have the LEGO sets or builds to fill all the space, you should think about scalability. This means thinking about how you will evolve, expand and grow your city over time.
The multiple levels of your city can be physically connected levels or connected using imagination and a back story that logically links the displays together to form a large multi-level display.
A bit of creativity can go a long way and the additional vertical space can be justified logically in many ways. Here are some examples to get your creative juices flowing:
- A lower level under the main table can represent a modern underground subway station, bus station and/ or mall.
- A lower level can represent an underwater deep sea display.
- A lower level can be a giant cavern under the surface of the earth that houses a whole underworld display.
- A lower level can be a bat cave-like super hero base or villain lair.
- A lower level can be a complete separate fantasy world because of a magic portal that is at the bottom of a well in the main city display. Think the wardrobe to Narnia and the different worlds in The LEGO Movie.
- A lower or upper level can represent the same city but at different points in time. If you have three levels, the centre level can represent a city in present time. The lower level can be the city in the past such as in Medieval times, Ancient Egyptian or Wild West. The upper level can represent the city in a future time.
- An upper level can represent outer space and can house spaceships, moon or planet surfaces or even Star Wars sets.
- An upper level can represent a section of the city that is at a higher altitude like up a mountain.
For a lower level, you can use smaller tables with shorter legs to be set under your main table.
Or, you could have two identical tables but both with short legs and stack them directly on top of each other. This set-up will give you almost-exactly the same area space to work with for each level.
You can work with tables each with legs of different heights so that the vertical space for each level is not uniform. If you have the space, nothing stops you from creating three levels of space. If you do not want to stack tables on top of each other and you are placing your display against a wall, you can mount shelves on the wall, above or below the tables.
With shelves, you are not just restricted to mounting the shelves directly above your main display. You can mount additional shelves elsewhere in another space away from your main city which is out of the way from everyday usage.
To use vertical space without using shelves, you can suspend sets with transparent nylon fishing line. This is commonly used to hang airplanes and helicopters above LEGO cities. However, I am sure that with some creativity and experimentation, you could even suspend a full building on a 32 x 32 stud base plate.
Overview of a LEGO City that Maximizes Space
In my small brick city, I have fully utilized the space that I dedicated for the layouts. My primary layout is on a custom-built counter top that is against the wall and covered on three sides. I have two shelves above this main counter top. The first shelf up is the same size as the counter top and serves as a cross section of the “uptown” of my city.
The topmost shelf is deliberately smaller than the shelf under it. One reason is that I did not want to create a full shelf that will completely cover the vertical space of my uptown shelf. This is to allow the flexibility of placing a tall building in uptown in future. I also wanted to suspend airplanes and helicopters from the ceiling so that it looks like they are hovering above both top levels.
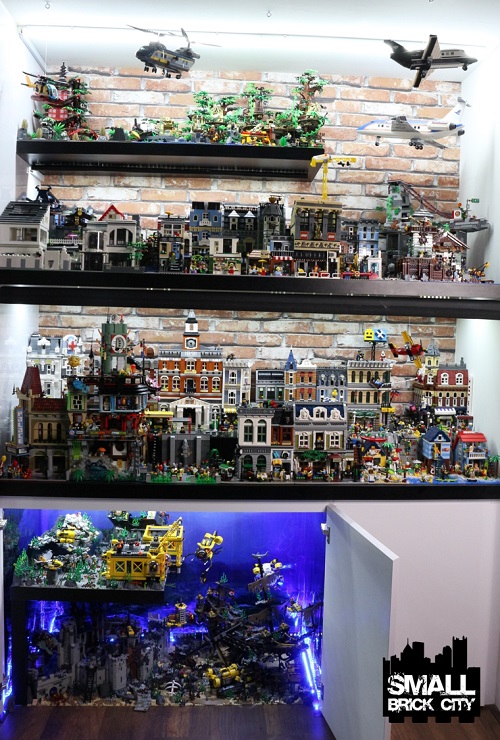
Each level represents a different cross section of the same small brick city.
The topmost shelf represents the highlands which is imagined to be a distance away and at a much higher altitude than the main town. It features a heavily forested area that holds ancient sites and ruins including a temple, plane crash site, river bed and a campsite for explorers and archaeologists.
I have two cabinets under the main counter top. The larger cabinet holds an elaborate underwater scene. The smaller cabinet next to it is currently unoccupied but will be used in future to display another section of the city.
Check out the overview of my LEGO city to see how the vertical space is maximized to create a 62,000+ piece LEGO city in a 6ft x 2ft space.